How to Make a Needlepoint Pillow: A Step-by-Step Guide
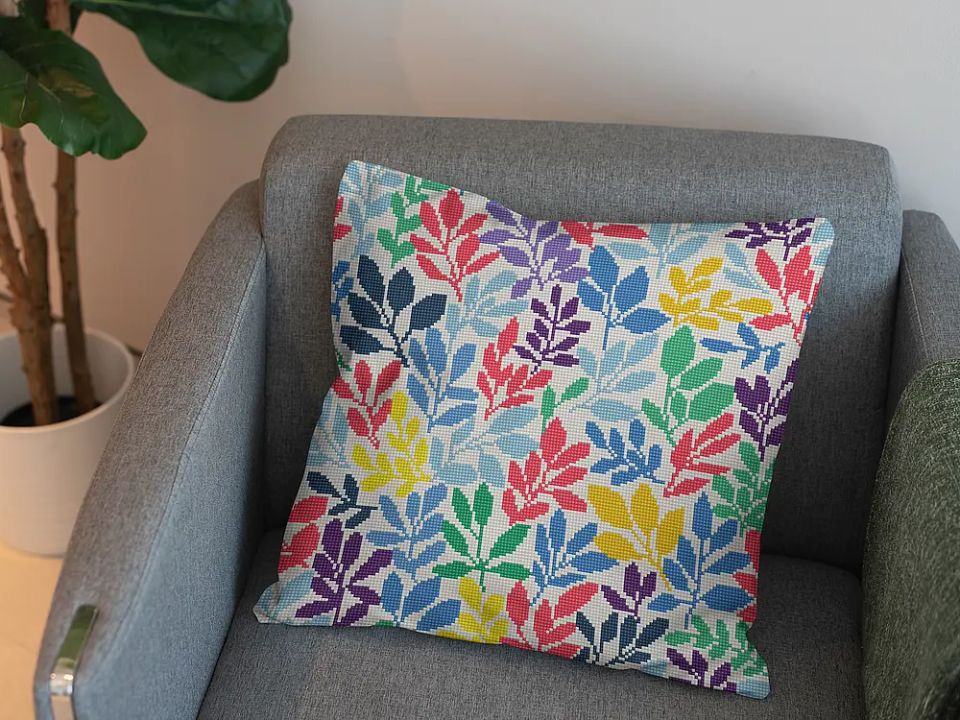
Needlepoint pillows are beautiful, handcrafted pieces that can add charm and personality to your home decor. It's a fun and easy project for beginners to try out a new craft, or for intermediate stitchers who want to make something for their home. This friendly, step-by-step guide will show you how to stitch a needlepoint design and turn it into a finished pillow. The process is simple. First, you stitch a pattern onto canvas. Next, you assemble the pillow. Finally, you add the finishing touches. Let's get started!
Preparing - Materials You’ll Need
Before you start, get all the things you need for your needlepoint pillow project. If you have everything you need to hand, it will make the process easier.
Needlepoint canvas – A strong, sturdy canvas mesh for needlepoint. You can use a blank canvas or a printed canvas for a pillow (with a design already on it) to make things easier. Make sure it's big enough to fit your design and an extra border for finishing.
Threads/Yarn – You will need tapestry wool or embroidery acrylic, or cotton floss in the colours you need for your design. Choose colours that go well with your design and home decor. (If using a kit, you'll get threads with it.)
Tapestry needle – This is a blunt-tipped needle. Choose the right needle size for your canvas count. The higher the canvas count (i.e., the more holes per inch), the finer the needle should be. For example, a size 20 tapestry needle works best with 12 or 13 count canvas – it’s thick enough to carry the yarn without damaging the mesh, but fine enough to pass through easily. Using the correct needle size helps you maintain even tension and protects the canvas from distortion.
You can use an embroidery frame or stretcher bars if you want to, but it's not essential. A frame, hoop, or stretcher bars will hold your canvas taut while you stitch, helping to keep it even.
Scissors – You will need sharp scissors for cutting threads and trimming canvas/fabric.
Backing fabric is a piece of fabric used for the back of the pillow. People often choose cotton, linen, or velvet for pillows. Choose a colour or pattern that goes well with your needlepoint design.
You will need sewing supplies to assemble the pillow. You will need either a sewing machine or a hand-sewing needle and strong thread. You will also need pins or clips to hold the pieces together while you are sewing.
Fiberfill stuffing to fill your pillow, or a pillow form (insert) of the right size.
Optional extras – A zipper (if you want a removable cover), decorative trim or piping for the edges, and a canvas edging tape or masking tape to bind the canvas edges (to stop the fabric from unravelling while you work).
With materials ready, let’s move on to the fun part – creating your pillow!
Step 1: Choose Your Design
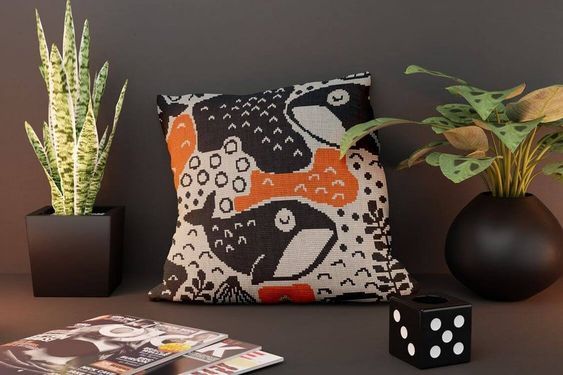
First, choose the perfect design for your needlepoint pillow. Let your imagination run wild – you could choose anything from a delicate floral design to a striking geometric pattern, or even a favourite quote or initials. The most important thing is to select a design you like and that matches the style of the pillow you want to make. If you're a beginner, it's a good idea to start with a simpler pattern to help you feel more confident.
Needlepoint pillow kits are a great choice for anyone from beginners to intermediate stitchers. A kit usually includes a canvas (often with the design already printed on it), the necessary threads, and instructions, all packaged together. Using a kit makes sure you have all the materials you need and a design that is right for making a pillow, which can make it easier to learn.
You can also create your own design on graph paper or find a pattern in a book or online. Just make sure it's the right size for the pillow you want to make.
Examples: If this is your first project, you could try a small design in the middle of the pillow (like a simple flower or a letter). Intermediate stitchers might choose more complex scenes or repeat patterns that cover the whole canvas. Whatever design you choose, make sure you have the colour pattern or chart ready (if it's not already printed on the canvas) so you can look at it while you stitch.
Step 2: Prepare the Canvas
Now that you have a design, it's time to get your canvas ready. If you're using a printed canvas for a pillow, you can skip the next step and go straight to mounting it on a frame.
For a blank canvas, you'll need to transfer or mark your design onto it. You can do this by drawing the outline of the pattern on the canvas with a pencil or a water-soluble fabric marker. (If the design is from a chart, find the centre of the canvas and the centre of the chart to help position it correctly.) Make sure there is a big space on the side of your design where you don't need to put anything. It's recommended to have about 1–2 inches (2.5–5 cm) of extra canvas on each side beyond the design area. You don't need to stitch all the way to the edge of your canvas. We'll use this extra border to finish and sew the pillow together. If your canvas piece is much larger than needed, you can trim it down, but always leave at least 2.5 cm of canvas border around the design for putting the pillow together later.
Tip: To stop the edges of the canvas from fraying while you work, cover them with masking tape or painter's tape. As an alternative, you could sew the edges with a zig-zag stitch using a sewing machine. Or you could sew around the edges with an overcast stitch. This isn't strictly necessary, but it helps keep things organised as you work on the canvas. Then, you need to attach the canvas to your embroidery frame, hoop, or stretcher bars. If you keep the canvas taut, it will be easier to stitch and the tension will be more even, which will make the stitches smoother. If you don't have a frame, you can still stitch without one – just be careful not to pull too hard and distort the canvas.
Step 3: Start Stitching the Needlepoint
With your canvas prepared and mounted, it’s time to start stitching your needlepoint design. Thread your tapestry needle with a comfortable length of yarn or floss (about an arm’s length to avoid tangling). Knot the end of your thread if you prefer, or use a waste knot or away knot technique if you’re familiar with anchoring threads (beginners may simply tie a small knot).
Begin at a logical starting point on your design – many stitchers start at the center of the design and work outward, or you can begin in a corner or large section. Use the tent stitch (half-cross stitch) as a good basic stitch to cover the canvas. A tent stitch is a small diagonal stitch that covers one intersection of canvas mesh; it’s the simplest and most commonly used needlepoint stitch.
Make your stitches in rows for efficient stitching (for example, work a row of diagonal stitches in one direction, then come back on the next row beneath). Maintain even tension on your thread as you work – each stitch should lie flat on the canvas, not too loose (which would leave slack or loops) and not too tight (which could distort the canvas). Working in small sections and completing one color at a time can help keep your tension consistent.
Feel free to experiment with other stitch techniques as you gain confidence. For instance, the basketweave stitch is often recommended for larger areas because it provides excellent coverage of the canvas with minimal distortion or warping.
The basketweave is worked diagonally across the canvas and helps distribute tension more evenly, which keeps the canvas square. You could also use the continental stitch (a variant of tent stitch), which provides full coverage on the back of the canvas. However, if you’re new to needlepoint, sticking with the basic tent stitch throughout your project is perfectly fine – your pillow will still look wonderful. As you progress, watch your design come to life with each stitch. Take breaks as needed to rest your hands and eyes. Specific advice for beginners: focus on one section at a time and don’t worry if your stitching isn’t absolutely perfect – consistency will improve with practice. Remember, any small imperfections will likely be unnoticeable on the final pillow. Enjoy the process of stitching; the journey is as satisfying as the finished product!
Three basic needlepoint stitches for the needlepoint pillow
Please use three basic needlepoint stitches for the needlepoint pillow: half cross stitch, continental stitch, and basketweave stitch.
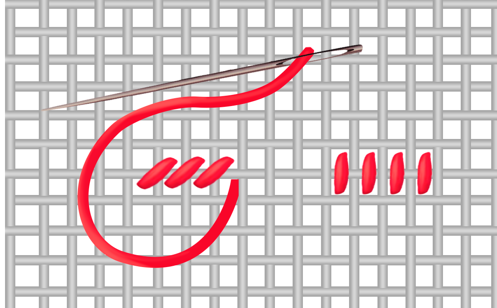
Although the half cross stitch doesn't provide comprehensive canvas coverage, it is easy to learn and suitable for limited areas requiring only a few stitches of a single color.
To begin, position the needle at the top left of your canvas or the designated block of color. Proceed from left to right in a row across the canvas, and then return along the row below. Some individuals find it convenient to work the return row by flipping the canvas upside down. The distinguishing feature of the half cross stitch is its vertical stitch on the "wrong" side of the canvas.
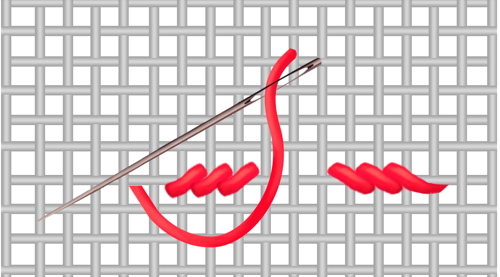
The continental stitch effectively covers the canvas but may cause some distortion. Nonetheless, it is ideal for working in smaller areas and is commonly used.
You will see a long diagonal stitch on the "wrong" side of the canvas.
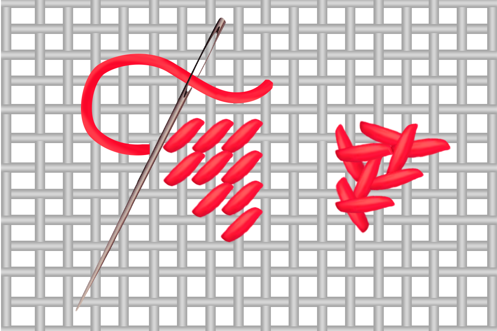
The needlepoint basketweave stitch is considered the most optimal among the basic needlepoint stitches. It provides excellent coverage of the canvas with minimal distortion. Whenever you encounter a large area to be stitched, it is advisable to employ the basketweave stitch.
This stitch derives its name from the basketweave pattern it forms on the "wrong" side of the canvas. Work this stitch diagonally, commencing from the top right-hand corner of the designated area.
Step 4: Block and Trim the Needlepoint Canvas
Once you have finished all the stitching and your needlepoint design is complete, give yourself a pat on the back – the hard part is done! Now, we need to prepare the stitched canvas for sewing by blocking it and trimming it.
Blocking the canvas is an important step to ensure your needlepoint lies flat and has the correct shape. Needlepoint stitches can pull the canvas out of shape (especially if you used stitches like continental that put more tension on one direction of the canvas). Blocking returns the canvas to a true square/rectangle and smooths out any distortions.
Here’s how to block your needlepoint canvas:
Dampen the canvas: Lightly mist the back of your needlepoint canvas with clean water (use a spray bottle to get an even, slight dampness). It should be damp, not soaking wet. This relaxes the canvas fibers.
Stretch and pin: Place the canvas face-down on a blocking board, a piece of corkboard, or even a thick towel on a flat surface. Gently stretch it to the proper shape and dimensions (use a ruler or measuring tape to make sure the edges are straight and the piece is the right measurements for your pillow). Pin the canvas in place at the edges. You can use rust-proof pins or tacks around the perimeter, placing them every inch or so to hold the shape. Ensure the design is not skewed – adjust as needed so that the canvas threads run vertical/horizontal.
Let it dry completely: Leave the pinned piece undisturbed until it is fully dry. As it dries, it will "set" in the flattened, stretched shape. Once dry, your needlepoint will be nice and flat again.
After blocking, trim the excess canvas, but be careful – do not cut too close to your stitching. A good rule of thumb is to leave about a 1-inch border of blank canvas all around the stitched design. This border will become the seam allowance when sewing the pillow. For example, if your stitched area measures 10” x 10”, cut the canvas to about 12” x 12”. Use your scissors and cut in a straight line (you can follow the canvas grid to keep it even).
Tip: It’s often best to trim after blocking, because blocking can sometimes change the shape slightly; trimming afterward ensures you cut a true square/rectangle.
At this stage, you may also prepare a lining if you choose to use one. Cutting a piece of thin cotton muslin or similar fabric to the same size as your needlepoint canvas and placing it behind the canvas can help protect the back of your needlework from wear. A lining isn’t mandatory, but attaching an inner lining will shield your stitches from friction and the stuffing, helping your design last longer. If you decide to use a lining, simply cut it now to match the dimensions of your trimmed canvas front.
Now you have your needlepoint front panel ready and trimmed to size (and optionally a lining of the same size). Next, we’ll assemble the pillow with the backing fabric.
Step 5: Sew the Pillow Together
It’s time to turn your needlepoint into a pillow! In this step, you will attach the backing fabric to your needlepoint piece (and lining, if using) to form the pillow cover. You can sew the pillow by hand or with a sewing machine.
Prepare the backing fabric
Take your chosen backing fabric and cut it to the same dimensions as your trimmed needlepoint canvas. For example, if your canvas is 12” x 12” including the border, cut the backing fabric to 12” x 12” as well. Make sure any pattern on the fabric is aligned how you want it on the pillow (for instance, if it has stripes, cut the fabric so the stripes will be straight).
If you plan to add a zipper for the pillow closure, now is the easiest time to do it. Take the backing fabric piece and sew the zipper along one of its edges (the bottom edge of the pillow, for instance). It’s often recommended to install the zipper before assembling the pillow, as it’s much simpler to sew it onto a single piece of fabric first. Follow the zipper package instructions or a tutorial if needed: usually, you’ll place the zipper face-down on the right side of the fabric edge, sew it in place, and possibly attach the other side of the zipper to a strip of fabric that will become part of the seam.
If you prefer not to use a zipper, you will simply sew the pillow closed in the final step, or you could use an envelope-style closure or Velcro as alternatives (but those are less common for needlepoint pillows).
Sandwich the pieces
Now, lay your needlepoint canvas front right side up (if you have a lining, place the lining behind the canvas). Then place the backing fabric right side down on top of the needlepoint, so that the right sides of the needlepoint and the backing are facing each other (the design and the good side of the backing fabric are touching on the inside). Align the edges of the front and back panels.
If you added piping or decorative trim such as fringe, position it between the front and back layers now: lay the trim along the edges of the canvas, with the decorative part facing inward (i.e., toward the center of the pillow sandwich) and the piping’s seam allowance or fringe tape aligned with the raw edges of the canvas. Pin or baste the trim in place first. Adding piping or cording at this stage will give your pillow a professional-looking finish and added durability on the edges – a great touch if you feel comfortable with this extra step.
Pin and sew the seams
Use pins or binding clips to hold the front and back (and any trim) together, aligned at the edges. It’s usually best to sew with the canvas side up, so you can see that you’re stitching just outside the needlepoint design. Using a sewing machine (with a heavy-duty needle, since canvas is stiff) or sewing by hand with a strong thread, stitch around the edges. Sew a seam about ½ inch from the edge (or whatever seam allowance you allowed, which should be within that 1-inch border you left). Sew almost all the way around the pillow, but leave an opening unsewn.
Typically, leave about a 3–4 inch opening on one side of the pillow (if you didn’t add a zipper elsewhere) – this gap is where you’ll insert the stuffing or pillow form. If you installed a zipper on one edge, you can actually sew around all four sides, as the zipper opening will be used for turning and stuffing (just remember to leave the zipper partially open while sewing, so you can turn the pillow right-side out afterward!).
When sewing the corners, it can help to pivot the fabric (if machine sewing) or reinforce with an extra stitch so the corners are strong. Once done, backstitch or secure the thread ends firmly so the seams won’t unravel. After sewing, you’ll have a pillow cover inside-out with an opening left for stuffing. Before we stuff it, there’s one more step.
Trim the corners (optional)
To help your pillow corners look neat, you can trim a small triangle off the excess fabric/canvas at each corner (outside the seam line). This reduces bulk. Be careful not to cut through your stitching. You can also clip the seam allowances slightly on each side of the corner. This step is optional, but it will make the corners less bulky when turned right-side out.
Step 6: Turn, Stuff, and Finish the Pillow
Now for the final step – turning your work right-side out and giving the pillow its shape!
Through the opening you left (or using the open zipper if you installed one), carefully turn the pillow cover right side out. Take your time, as the needlepoint canvas is stiff. Pull the fabric through the opening until the front of your needlepoint design is on the outside. Use your fingers to push out each corner gently. You can use a blunt tool like the eraser end of a pencil or a chopstick to help push the corners out so they are nice and sharp, but be gentle to avoid poking through the fabric. Once turned, take a moment to admire the front of your needlepoint pillow cover – your beautiful stitching is now showcased!
Next, fill the pillow. If you have a pillow insert (a pre-made cushion form), insert it through the opening, adjusting it until it fits snugly and evenly. Make sure it fills out the corners.
If you’re using loose fiberfill stuffing, take small bunches of stuffing and pack them into the pillow cover. Start by pushing stuffing into the far corners first, then gradually fill the body of the pillow. Add stuffing until the pillow is pleasingly plump and to your desired firmness. Be careful not to overstuff – you want it to be filled out and cushy, but overfilling can strain the seams.
Finally, close up the pillow’s opening. If you added a zipper, this is as simple as zipping the pillow closed. Otherwise, thread a sewing needle with matching thread and use an invisible stitch (also known as a ladder stitch) to hand-sew the opening shut. This stitch will make the seam nearly undetectable. Tie off the thread securely and hide the knot inside the seam. Once the opening is closed, your pillow is fully assembled! Give your pillow a final plump and adjust the corners and edges so everything sits well.
Finishing Touches and Final Tips
Congratulations – you’ve made a needlepoint pillow! You can leave it as-is, or add a few finishing touches to really make it stand out.
If you haven’t already added trim, you can still sew tassels onto the pillow’s corners or attach pom-poms or decorative buttons for extra flair. These little additions can give a fun or luxurious look to your pillow.
Some crafters like to personalize the backing fabric too – for example, adding an embroidered initial or using a contrasting fabric for a reversible look. Feel free to be creative with the back of the pillow as well.
Needlepoint pillows often look great in pairs or groups. Once you’ve finished one, you might use similar colors or themes to make a complementary pillow. It’s a wonderful way to tie a room’s décor together.
To keep your pillow looking its best, remember that handmade needlepoint can be gently vacuumed (using a soft brush attachment) to remove dust. If it ever needs deeper cleaning, spot clean it carefully with mild soap and water – do not toss it in a washing machine, as that could distort the needlepoint. With gentle care, your needlepoint pillow will remain vibrant and last for years to come.
By following this guide, you’ve transformed a piece of canvas and some yarn into a custom pillow that’s both a work of art and a cozy décor item. This DIY approach ensures your pillow is truly one-of-a-kind and filled with personal touches. Whether you made it for your own home or as a gift, take pride in your craftsmanship every time you see it on the couch or chair. If you’re excited to continue stitching, there are many needlepoint pillow kits and patterns available to inspire your next project – the more you practice, the more confident you’ll become. We hope this step-by-step guide has been helpful and encouraging. Now, grab your newly made pillow, display it proudly, and enjoy the comfort and style it brings to your space.
Happy stitching!